Ford Fiesta: Interior Trim and Ornamentation / Parcel Shelf. Removal and Installation
Ford Fiesta 2014 - 2019 Service Manual / Body and Paint / Interior Trim and Ornamentation / Parcel Shelf. Removal and Installation
Removal
NOTE: Removal steps in this procedure may contain installation details.
-
Remove the rear seat cushion.
Refer to: Rear Seat Cushion (501-10 Seating, Removal and Installation).
-
Remove the seatbelt anchor bolts and position the seatbelts aside.
Torque: 35 lb.ft (48 Nm)
 |
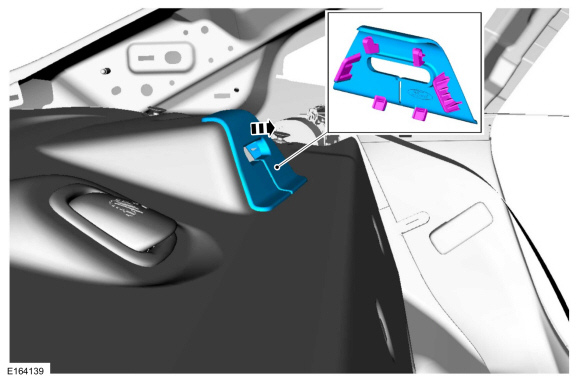
-
NOTE: RH side shown, LH side similar.
NOTE: To avoid damage to the trim panels, remove any retaining clips from the body and attach them to the trim panels before installing.
On both sides.
Release the clips and remove the trim panel.
 |
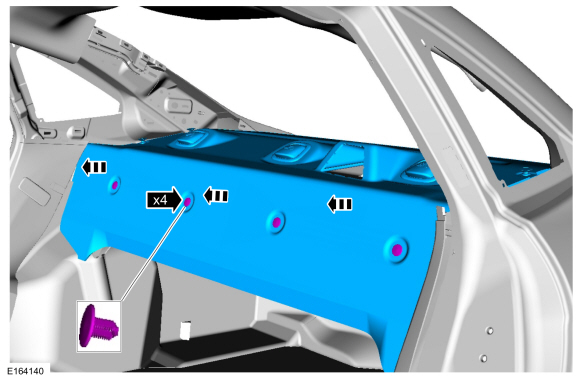
-
On both sides, remove the C-pillar upper trim panel.
Refer to: C-Pillar Upper Trim Panel - 4-Door (501-05 Interior Trim and Ornamentation, Removal and Installation).
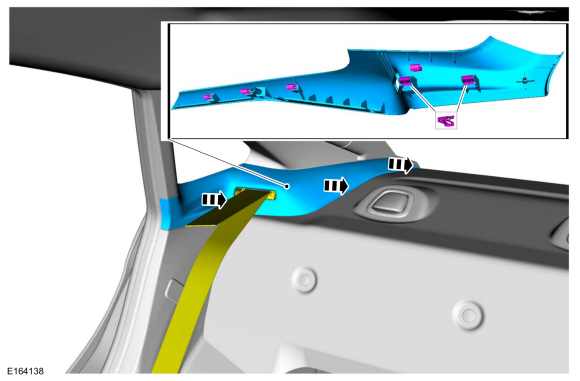
-
NOTE: Center rear safety belt removed for clarity.
Release the tabs and remove the seatbelt guide.
 |
-
NOTE: Rear safety belts removed for clarity.
Remove the pin-type retainers and the parcel shelf.
 |
Installation
-
NOTE: During installation, make sure the safety belt webbing is not twisted and the safety belts and buckles are accessible to the occupants.
To install, reverse the removal procedure.
 Headliner - Lowering - 5-Door. Removal and Installation
On both sides.
Remove the retainers and the sun visor.
On both sides.
Remove the retainer and the sun visor clip...
 Loadspace Trim Panel - 5-Door. Removal and Installation
Removal
NOTE:
RH side shown, LH side similar.
NOTE:
Removal steps in this procedure may contain installation details.
NOTE:
To avoid damage to the trim panels, remove any retaining
clips from the body and attach them to the trim panels before
installing...
Other information:
Ford Fiesta 2014 - 2019 Service Manual: SYNC Module [APIM]. Removal and Installation
Removal NOTE: Removal steps in this procedure may contain installation details. Remove the FDIM . Refer to: Front Display Interface Module (FDIM) (415-00B Information and Entertainment System - General Information - Vehicles With: AM/FM/CD/SYNC/Touchscreen Display, Removal and Installation)...
Ford Fiesta 2014 - 2019 Service Manual: Anti-Lock Brake System (ABS) and Stability Control - Overview. Description and Operation
The ABS and stability control systems are comprised of the following subsystems which assist the driver in maintaining control of the vehicle: ABS EBD Traction control Electronic Stability Control (ESC) Hill start assist The ABS helps maintain steering control by preventing the wheels from locking up during hard braking...
Categories
- Manuals Home
- Ford Fiesta Service Manual (2014 - 2019)
- Service Information
- Manual Transmission - 6-Speed Manual Transmission – B6
- Camshafts. Removal and Installation
- Timing Belt. Removal and Installation
- Manual Transmission, Clutch, Transfer Case and Power Transfer Unit
Parking Brake Control. Removal and Installation
Removal
NOTE: Removal steps in this procedure may contain installation details.
Remove the floor console.Refer to: Floor Console (501-12 Instrument Panel and Console, Removal and Installation).
Remove the driver seat.
Refer to: Front Seat (501-10 Seating, Removal and Installation).
Remove the parking brake cable adjustment lock nut.
 Loosen the parking brake cable adjustment nut.
Copyright © 2026 www.fofiesta7.com