Ford Fiesta: Glass, Frames and Mechanisms / Windshield Glass. Removal and Installation
Special Tool(s) / General Equipment
 |
300-AST1770E Deluxe Air Knife |
| Glass Removal Suction Cup | |
| Wooden Block | |
Materials
| Name | Specification |
|---|---|
| Sika® SikaTack® MACH 60 / Sika® SikaTack® MACH 30 / Dow® BETASEAL™ Express | - |
| Sika Tack ASAP Urethane Adhesive | - |
| Dow Urethane One Step Glass Primer Betaprime™ 5500/5500A/5500SA |
- |
| Sika Urethane Metal and Glass Primer Sika 206 G+P |
- |
| Motorcraft® Ultra-Clear Spray Glass Cleaner ZC-23 |
ESR-M14P5-A |
Removal
-
Remove the Interior rear view mirror.
Refer to: Interior Rear View Mirror (501-09 Rear View Mirrors, Removal and Installation).
-
Remove the cowl panel grille.
Refer to: Cowl Panel Grille (501-02 Front End Body Panels, Removal and Installation).
-
Remove the A-Pillar trim panel.
Refer to: A-Pillar Trim Panel (501-05 Interior Trim and Ornamentation, Removal and Installation).
-
Remove the B-Pillar trim panel.
Refer to: B-Pillar Trim Panel (501-05 Interior Trim and Ornamentation, Removal and Installation).
-
Remove the retainers and the RH side sun visor.
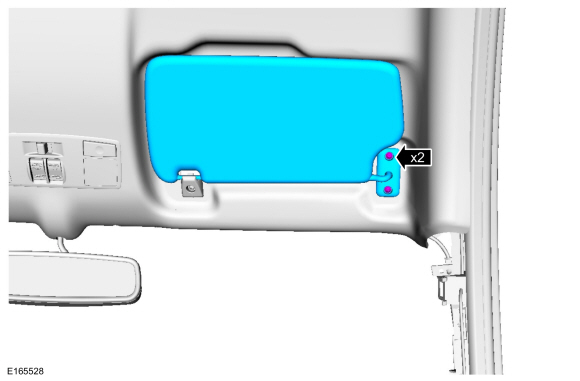 |
-
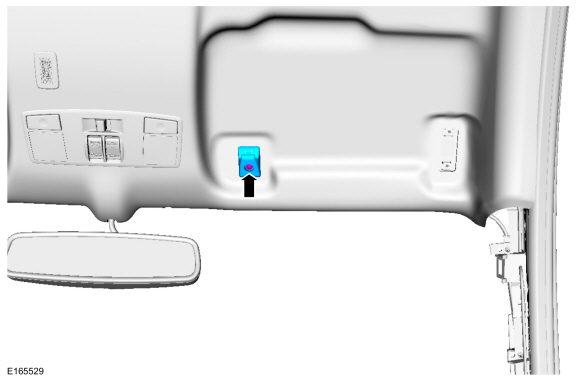
Remove the retainer and remove the sunvisor hook.
 |
-
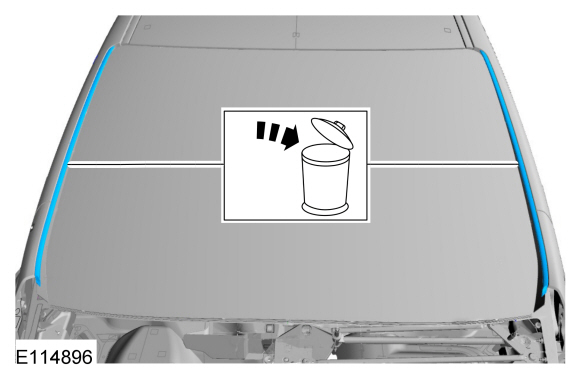
Remove and discard the windshield mouldings.
 |
-
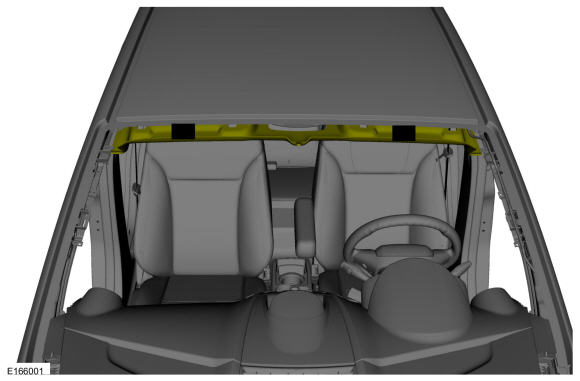
NOTE: Windshield removed for clarity.
Place two blocks of wood spacing the headliner away from the windshield.
Use the General Equipment: Wooden Block
 |
-


NOTICE: To avoid rust formation, use extreme care not to scratch the paint or primer or otherwise damage the pinch weld during glass removal.
NOTE: Insert the blade into the Deluxe Air Knife 300-AST1770E so the flat side is against the glass. This leaves the entire urethane adhesive bead on the pinch weld and allows a dry fit of the replacement windshield glass.
NOTE: Lubricate the urethane adhesive with water to aid the Deluxe Air Knife 300-AST1770E when cutting.
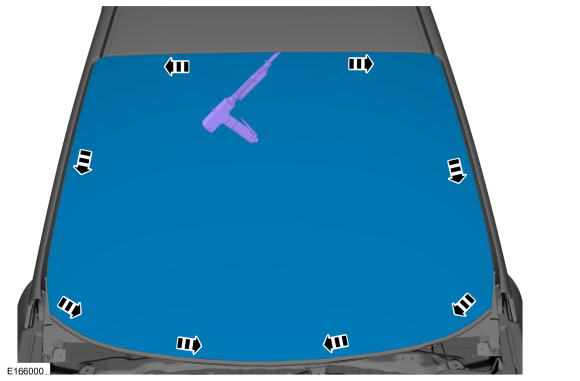
Working from inside the vehicle, cut the urethane adhesive starting at the top center and working toward the bottom corners then across the bottom.
Use Special Service Tool: 300-AST1770E Deluxe Air Knife.
 |
-
-
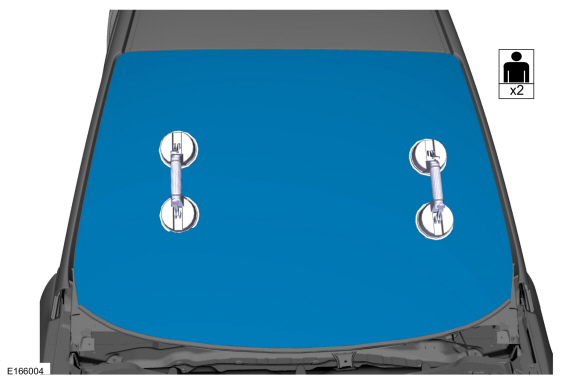
This procedure step requires the specified number of technicians.
Use the General Equipment: Glass Removal Suction Cup
-
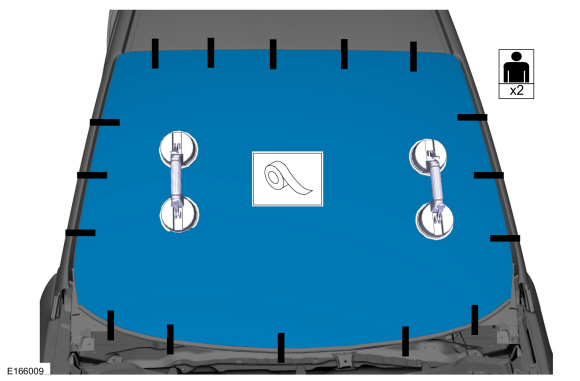
Remove the windshield glass.
-
This procedure step requires the specified number of technicians.
 |
Installation
-
If installing the original windshield glass, remove the excess urethane adhesive.
 |
-
Install the windshield glass.
Use the General Equipment: Glass Removal Suction Cup
|
-
Use a non-staining grease pencil to make alignment marks
on the windshield glass at the setting blocks (if equipped) and the
body to aid in the windshield window glass alignment during
installation.
Use the General Equipment: Glass Removal Suction Cup
 |
-
Remove the windshield glass from the body.
Use the General Equipment: Glass Removal Suction Cup
|
-
 WARNING:
Repair any corrosion found on the pinch weld. The
pinch weld is a structural component of the vehicle. Corrosion left
unrepaired may reduce the structural integrity of the vehicle. Failure
to follow this instruction may result in serious injury to vehicle
occupant(s).
WARNING:
Repair any corrosion found on the pinch weld. The
pinch weld is a structural component of the vehicle. Corrosion left
unrepaired may reduce the structural integrity of the vehicle. Failure
to follow this instruction may result in serious injury to vehicle
occupant(s).
NOTE: Avoid scratching the pinch weld. Repair all minor scratches or exposed metal on the pinch weld following manufacturer's instructions. Use the same brand pinch weld primer, glass primer and urethane adhesive.
NOTE: Touching the adhesive surface impairs the rebonding.
NOTE: Make sure the mating surfaces are clean and free of foreign material.
-
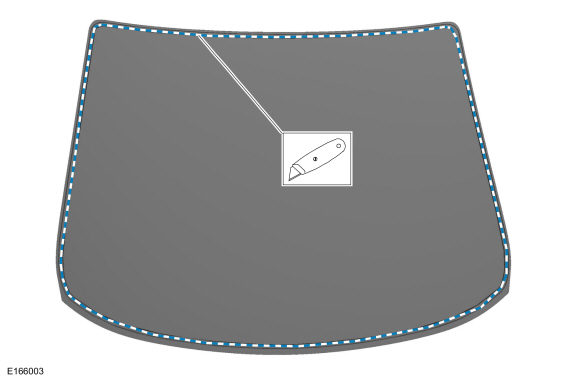
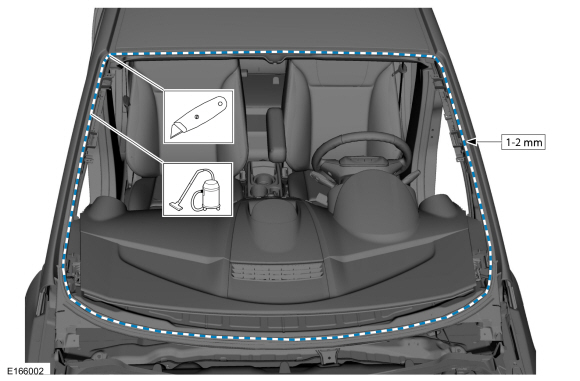
Using a utility knife, trim the urethane adhesive
leaving a 1 mm to 2 mm (0.04 in to 0.08 in) base of original equipment
urethane adhesive on the pinch weld.
-
Using a soft brush or vacuum, remove any foreign material or dirt from the pinch weld.
-
Using a utility knife, trim the urethane adhesive
leaving a 1 mm to 2 mm (0.04 in to 0.08 in) base of original equipment
urethane adhesive on the pinch weld.
 |
-
Position the windshield glass on the body.
Use the General Equipment: Glass Removal Suction Cup
|
-
Dry-fit the windshield glass on the existing urethane adhesive bead on the pinch weld.
Use the General Equipment: Glass Removal Suction Cup
-
Position the windshield glass on the pinch weld,
centering the windshield glass in the opening. Adjust the windshield
glass stop blocks (if equipped) as needed for best fit.
-
Make new alignment marks with tape or non-staining
grease pencil (preferably at the windshield glass stop blocks if
equipped) on the windshield glass and the body.
|
-
Remove the windshield glass from the body.
Use the General Equipment: Glass Removal Suction Cup
|
-
After the dry-fit alignment, remove the glass from the
windshield opening and place on a stable work surface with the interior
side of the glass facing up.
Use the General Equipment: Glass Removal Suction Cup
-
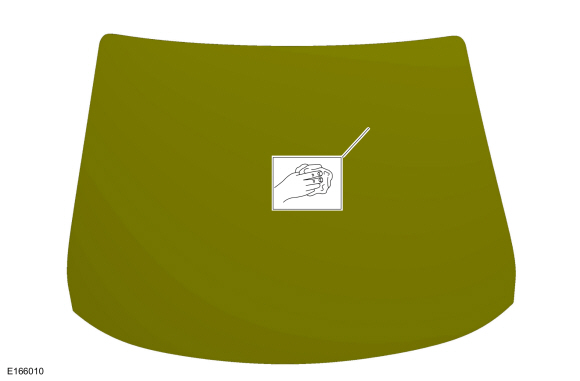
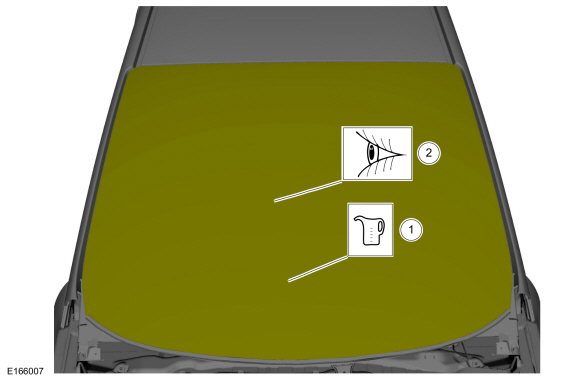
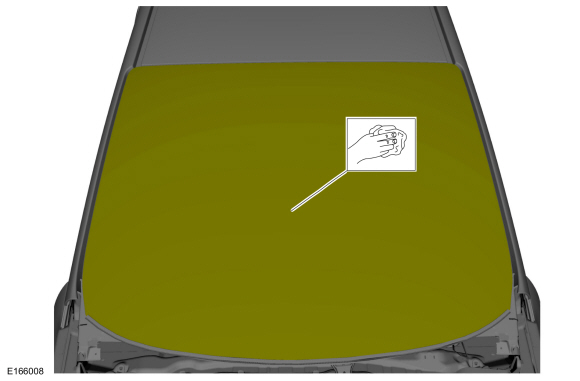
Clean the inside of the new windshield glass with glass cleaner.
Material: Motorcraft® Ultra-Clear Spray Glass Cleaner / ZC-23 (ESR-M14P5-A)
 |
-
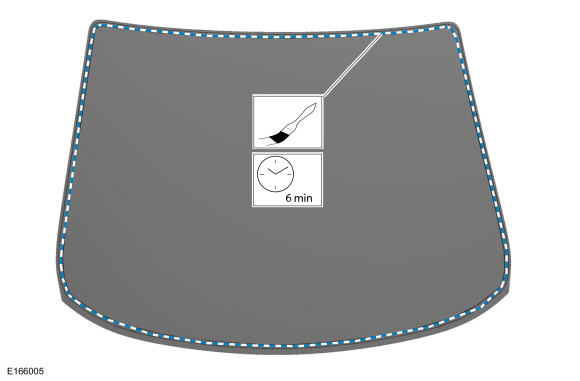
NOTE: Use the same brand and cure-rate products for the urethane adhesive and glass primer. Do not mix different brands of urethane adhesive and glass primer. For additional information, refer to the Material Chart in this procedure.
Apply glass primer according to the manufacturer's instructions. Allow at least 6 minutes to dry.
Material: Dow Urethane One Step Glass Primer / Betaprime™ 5500/5500A/5500SA
Material: Sika Urethane Metal and Glass Primer / Sika 206 G+P
 |
-
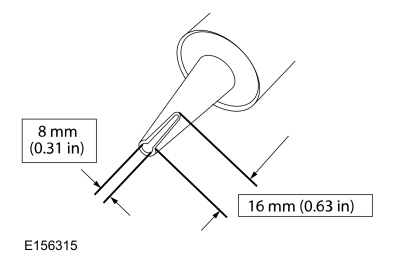
Cut the urethane adhesive applicator tip to specification.
Material: Sika® SikaTack® MACH 60 / Sika® SikaTack® MACH 30 / Dow® BETASEAL™ Express
Material: Sika Tack ASAP Urethane Adhesive
 |
-
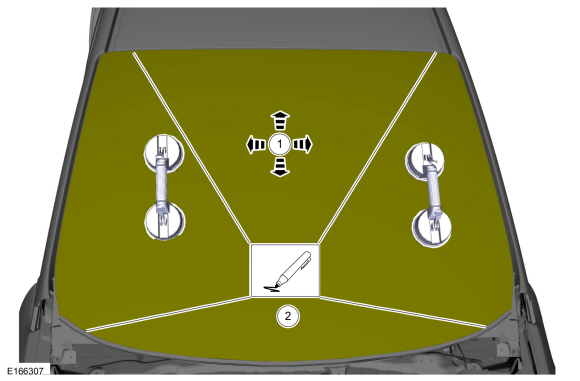
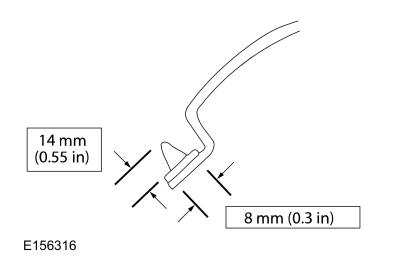
The new urethane adhesive bead applied must be 14 mm (0.551 in) high and 8 mm (0.314 in) wide.
Material: Sika® SikaTack® MACH 60 / Sika® SikaTack® MACH 30 / Dow® BETASEAL™ Express
Material: Sika Tack ASAP Urethane Adhesive
 |
-
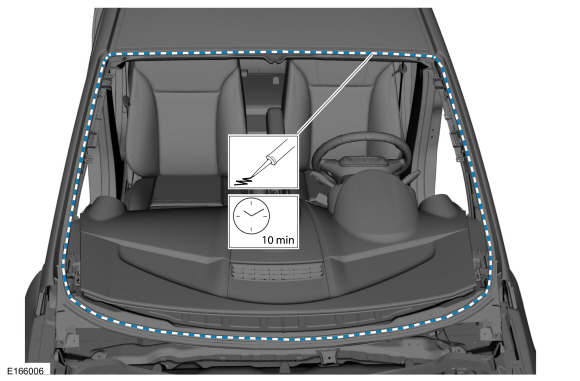
NOTE: Position the windshield glass within 10 minutes of applying the urethane adhesive.
NOTE: Use either a high-ratio air, electric, or battery-operated caulk gun that will apply the urethane adhesive with less effort and a continuous bead.
Apply urethane adhesive on top of the existing trimmed urethane adhesive bead on the pinch weld, starting and ending at the bottom of the windshield near the center, make sure there are no gaps in the bead.
Material: Sika® SikaTack® MACH 60 / Sika® SikaTack® MACH 30 / Dow® BETASEAL™ Express
Material: Sika Tack ASAP Urethane Adhesive
 |
-
WARNING:
Do not drive vehicle until the urethane adhesive
seal has cured. Follow urethane adhesive manufacturer's curing
directions. Inadequate or incorrect curing of the urethane adhesive seal
will adversely affect glass retention. Failure to follow these
instructions may result in serious injury to vehicle occupant(s).
NOTICE: Before positioning the windshield glass, open the vehicle windows to prevent the air pressure of closing doors from affecting the urethane adhesive bond.
NOTICE: The door windows must be left open during the adhesive curing time.
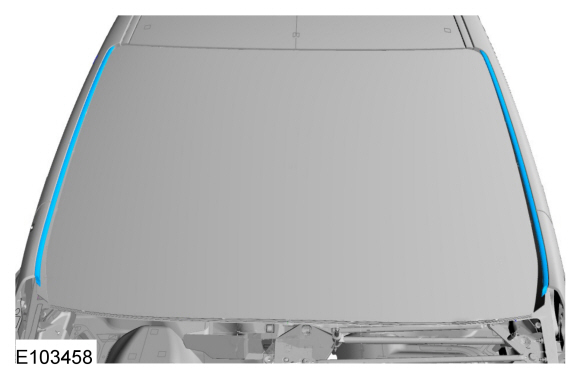
NOTE: The adhesive strip backings must be removed from the A-pillar mouldings before installing the windshield.
-
Install the windshield glass, aligning it to the
marks previously made. Press firmly by hand to ensure a good bond to the
A-pillar mouldings.
Use the General Equipment: Glass Removal Suction Cup
-
Using tape, secure the windshield glass in the correct position until the adhesive has cured.
-
Install the windshield glass, aligning it to the
marks previously made. Press firmly by hand to ensure a good bond to the
A-pillar mouldings.
 |
-
After the urethane adhesive has cured, visually check
the windshield glass seal for air or water leaks through the urethane
adhesive bead and add urethane adhesive as necessary.
 |
-
If necessary, remove excess urethane adhesive from the exterior surface of the windshield glass.
Material: Motorcraft® Ultra-Clear Spray Glass Cleaner / ZC-23 (ESR-M14P5-A)
 |
-
NOTICE: Make sure not to crease the headliner when removing the wood blocks.
NOTE: Windshield removed for clarity.
Remove the blocks and position the front portion of the headliner.
|
-
Install the windshield mouldings.
 |
-
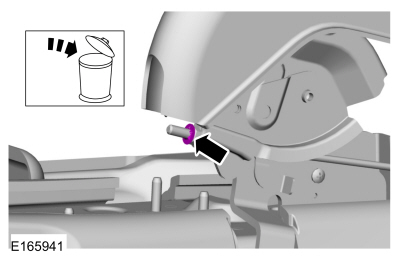
Install the sunvisor hook and tighten the retainer.
|
- Install the RH side sunvisor and tighten the retainers.
|
-
Install B-pillar trim panel.
Refer to: B-Pillar Trim Panel (501-05 Interior Trim and Ornamentation, Removal and Installation).
-
Install Pillar trim panel.
Refer to: A-Pillar Trim Panel (501-05 Interior Trim and Ornamentation, Removal and Installation).
-
Install interior rear view mirror.
Refer to: Interior Rear View Mirror (501-09 Rear View Mirrors, Removal and Installation).
-
Install the cowl panel grille.
Refer to: Cowl Panel Grille (501-02 Front End Body Panels, Removal and Installation).

 Rear Door Glass Top Run. Removal and Installation
Removal
NOTE:
RH shown, LH similar.
Remove the rear door window glass.
Refer to: Rear Door Window Glass (501-11 Glass, Frames and Mechanisms, Removal and Installation)...
Other information:
Ford Fiesta 2014 - 2019 Service Manual: Communications Network - Overview. Description and Operation
Overview Multiplexing is a method of sending 2 or more signals simultaneously over a single circuit. Multiplexing allows 2 or more electronic modules (nodes) to communicate over a twisted wire pair [data (+) and data (-)] network. The information or messages that can be communicated on these wires consists of commands, status or data...
Ford Fiesta 2014 - 2019 Service Manual: 3rd-4th Gear Synchronizer. Removal and Installation
Special Tool(s) / General Equipment 205-199 (T83T-3132-A1) Installer, Spindle/Axle ShaftT83-4000-ATKIT-1983-FTKIT-1983-FLMTKIT-1983-FX 205-D015 (D80L-630-4) Step Plate 211-014Remover, Steering Wheel 307-003 (T57L-500-B) Holding Fixture, Transmission 307-680Table, Assembly (DPS6)TKIT-2010D-FLMTKIT-2010D-ROW 308-847Instal..
Categories
- Manuals Home
- Ford Fiesta Service Manual (2014 - 2019)
- Jacking and Lifting - Overview. Description and Operation
- Front Strut and Spring Assembly. Removal and Installation
- Camshafts. Removal and Installation
- Clutch - 6-Speed Manual Transmission – B6
- Engine
Parking Brake Control. Removal and Installation
Removal
NOTE: Removal steps in this procedure may contain installation details.
Remove the floor console.Refer to: Floor Console (501-12 Instrument Panel and Console, Removal and Installation).
Remove the driver seat.
Refer to: Front Seat (501-10 Seating, Removal and Installation).
Remove the parking brake cable adjustment lock nut.
 Loosen the parking brake cable adjustment nut.