
Ford Fiesta: Information and Entertainment System - General Information - Vehicles With: AM/FM/CD/SYNC / Front Door Speaker. Removal and Installation
Ford Fiesta 2014 - 2019 Service Manual / Information and Entertainment Systems / Information and Entertainment System - General Information - Vehicles With: AM/FM/CD/SYNC / Front Door Speaker. Removal and Installation
Removal
NOTE: Removal steps in this procedure may contain installation details.
-
Remove the front door trim panel.
Refer to: Front Door Trim Panel (501-05 Interior Trim and Ornamentation, Removal and Installation).
-
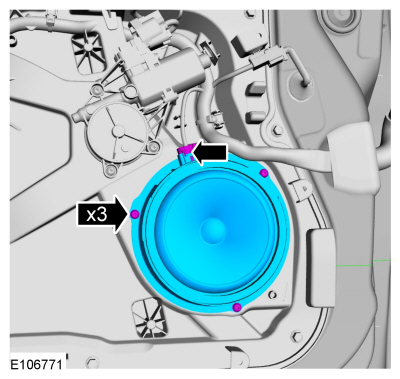
Remove the bolts and the speaker.
-
Disconnect the electrical connector.
Torque: 18 lb.in (2 Nm)
-
Disconnect the electrical connector.
 |
Installation
-
To install, reverse the removal procedure.
 Front Door Tweeter Speaker. Removal and Installation
Removal
Remove the front door handle.
Refer to: Interior Front Door Handle (501-14 Handles, Locks, Latches and Entry Systems, Removal and Installation)...
 Global Positioning System Module (GPSM). Removal and Installation
Special Tool(s) /
General Equipment
Interior Trim Remover
Removal
NOTE:
This step is only necessary when installing a new component...
Other information:
Ford Fiesta 2014 - 2019 Service Manual: Bezel Diagnostics. General Procedures
Check NOTE: If there is a concern with one of the following components and Bezel Diagnostics cannot be accessed, obtain the module part number or ESN by referencing the label attached to the module. Inoperative ACM Inoperative (blank or does not power on) display unit (non-touchscreen display or touchscreen display) Inoperative FCIM or radio control panel ..
Ford Fiesta 2014 - 2019 Service Manual: Noise, Vibration and Harshness (NVH). Diagnosis and Testing
Special Tool(s) MASTERTECH MTS-4000 ANALYZER257-00018 EngineEAR107-R2100Chassis EarsJSP97170 Squeak And Rattle Kit164-R4900 Ultrasonic Leak Detector134-R0135 Diagnostic Theory The shortest route to an accurate diagnosis results from: System knowledge, including comparison with a known good syste..
Categories
- Manuals Home
- Ford Fiesta Service Manual (2014 - 2019)
- Jacking and Lifting - Overview. Description and Operation
- Engine Component View. Description and Operation
- Timing Belt. Removal and Installation
- Valve Cover. Removal and Installation
- Camshafts. Removal and Installation
Brake Master Cylinder. Removal and Installation
Removal
NOTICE: If the fluid is spilled on the paintwork, the affected area must be immediately washed down with cold water.
NOTE: Removal steps in this procedure may contain installation details.
All vehicles
Remove the battery tray.Refer to: Battery Tray - 1.6L Duratec-16V Ti-VCT (88kW/120PS) – Sigma (414-01 Battery, Mounting and Cables, Removal and Installation).
Refer to: Battery Tray - 1.6L EcoBoost (132kW/180PS) – Sigma (414-01 Battery, Mounting and Cables, Removal and Installation).
Disconnect the vacuum tube from the brake booster and detach the routing clip.

Copyright © 2026 www.fofiesta7.com