Ford Fiesta: Information and Entertainment System - General Information - Vehicles With: AM/FM/CD/SYNC / Audio Unit Antenna Cable. Removal and Installation
Ford Fiesta 2014 - 2019 Service Manual / Information and Entertainment Systems / Information and Entertainment System - General Information - Vehicles With: AM/FM/CD/SYNC / Audio Unit Antenna Cable. Removal and Installation
Special Tool(s) / General Equipment
| Interior Trim Remover |
Removal
NOTE: Removal steps in this procedure may contain installation details.
NOTE: The AM / FM /Satellite radio antenna cables are part of the vehicle wiring harness. Because the cables cannot be removed from the harness, this procedure applies to the replacement of the cables only.
Front cable
-
Remove the ACM .
Refer to: Audio Front Control Module (ACM) (415-00A Information and Entertainment System - General Information - Vehicles With: AM/FM/CD/SYNC, Removal and Installation).
Refer to: Audio Front Control Module (ACM) (415-00A Information and Entertainment System - General Information - Vehicles With: AM/FM/CD/SYNC, Removal and Installation).
Refer to: Audio Front Control Module (ACM) (415-00B Information and Entertainment System - General Information - Vehicles With: AM/FM/CD/SYNC/Touchscreen Display, Removal and Installation).
-
Release the retainers and remove the bracket.
 |
-
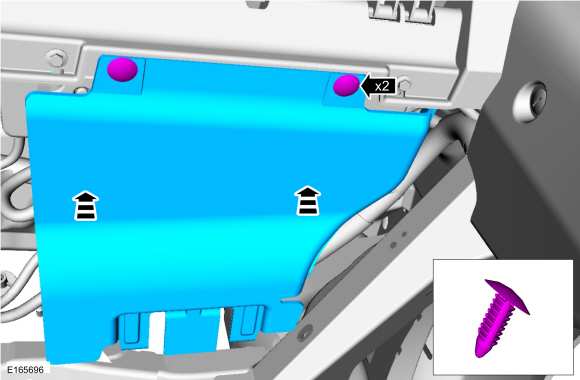
Open the glove compartment door and remove the glove compartment.
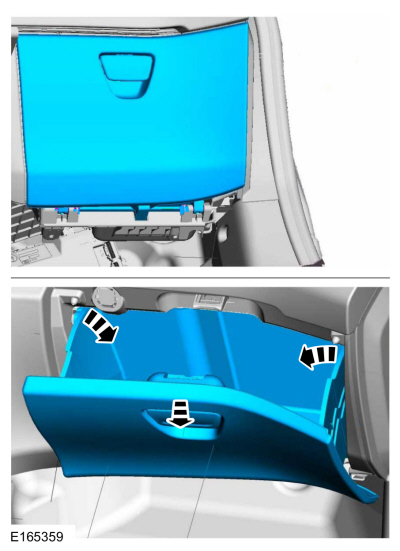 |
-
RH side only.
-
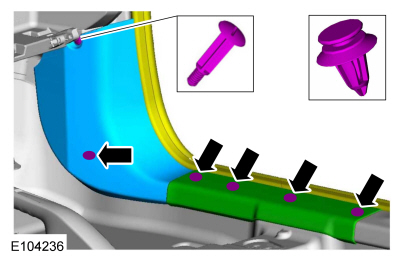
Position aside the weather strip.
-
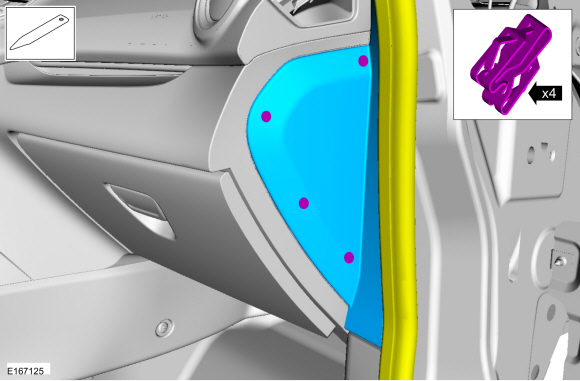
Release the clips and remove the floor console side finish panel.
Use the General Equipment: Interior Trim Remover
-
Position aside the weather strip.
 |
-
RH side only.
-
Position aside the weather strip.
-
Release the retainers and remove the scuff plate.
-
Release the retainers and remove the lower cowl trim panel.
-
Position aside the weather strip.
 |
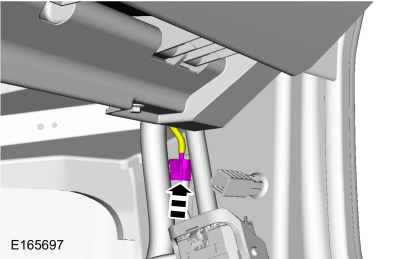
-
NOTE: AM / FM radio antenna cable shown, AM / FM /Satellite radio antenna cable similar.
Disconnect the front antenna cable.
 |
Rear cable
-
Carefully lower the headliner.
Refer to: Headliner - 4-Door (501-05 Interior Trim and Ornamentation, Removal and Installation).
Refer to: Headliner - 5-Door (501-05 Interior Trim and Ornamentation, Removal and Installation).
-
Disconnect the electrical connector.
 |
-
RH side only.
-
Position aside the weather strip.
-
Release the clips and remove the floor console side finish panel.
Use the General Equipment: Interior Trim Remover
-
Position aside the weather strip.
|
-
RH side only.
-
Position aside the weather strip.
-
Release the retainers and remove the scuff plate.
-
Release the retainers and remove the lower cowl trim panel.
-
Position aside the weather strip.
|
-
NOTE: AM / FM radio antenna cable shown, AM / FM /Satellite radio antenna cable similar.
Disconnect the rear antenna cable.
 |
Installation
Front cable
-
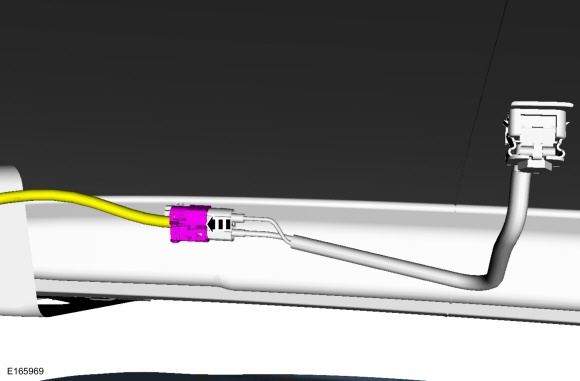
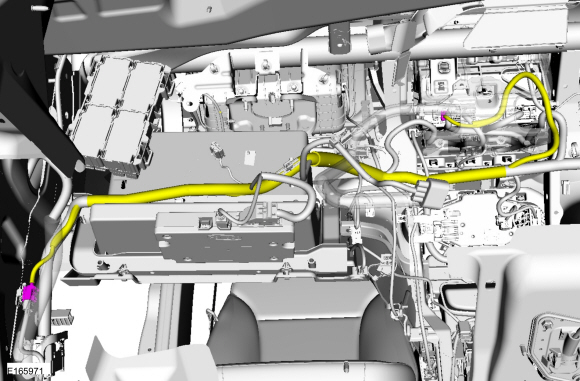
Overlay the new AM / FM /Satellite radio front antenna cable on the
vehicle wiring harness, following the routing shown. Secure the new AM /
FM /Satellite radio front antenna cable to the wiring harness with tape
or zip ties as necessary.
 |
-
To install, reverse the removal procedure.
Rear cable
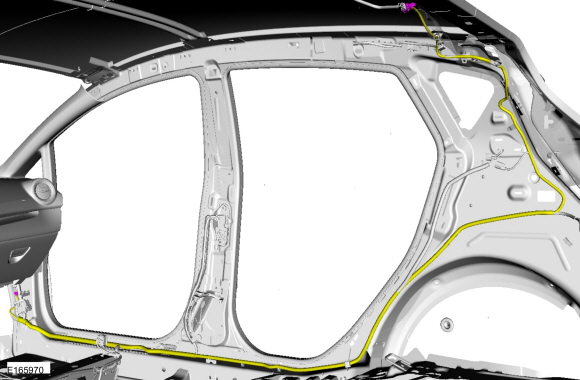
-
Overlay the new AM / FM /Satellite radio rear antenna cable on the
vehicle wiring harness, following the routing shown. Secure the new AM /
FM /Satellite radio rear antenna cable to the wiring harness with tape
or zip ties as necessary.
 |
-
To install, reverse the removal procedure.
 Audio Unit Antenna. Removal and Installation
Removal
NOTE:
Removal steps in this procedure may contain installation details.
Lower the headliner.
Refer to: C-Pillar Upper Trim Panel - 4-Door (501-05 Interior Trim and Ornamentation, Removal and Installation)...
 Audio Front Control Module (ACM). Removal and Installation
Removal
NOTE:
If the ACM did not respond to the diagnostic scan tool, As-Built Data may need to be entered as part of the repair.
NOTE:
This step is only necessary when installing a new component...
Other information:
Ford Fiesta 2014 - 2019 Service Manual: No Communication Between the Integrated Diagnostic System (IDS) and the Vehicle. General Procedures
Configuration WARNING: Before beginning any service procedure in this section, REFER to Safety Warnings in section 100-00 General Information. Failure to follow this instruction may result in serious personal injury. Refer to: Health and Safety Precautions (100-00 General Information, Description and Operation)...
Ford Fiesta 2014 - 2019 Service Manual: Active Grille Shutter - System Operation and Component Description. Description and Operation
System Operation System Diagram Network Message Chart PCM Network Input Messages Broadcast Message Originating Module Message Purpose Vehicle speed ABS module Vehicle speed is used to determine positioning of the grille shutters...
Categories
- Manuals Home
- Ford Fiesta Service Manual (2014 - 2019)
- Maintenance Schedules
- Engine Component View. Description and Operation
- Manual Transmission, Clutch, Transfer Case and Power Transfer Unit
- Valve Cover. Removal and Installation
- Jacking and Lifting - Overview. Description and Operation
Brake Backing Plate. Removal and Installation
Removal
NOTE: Removal steps in this procedure may contain installation details.
Remove the brake shoes.Refer to: Brake Shoes (206-02 Drum Brake, Removal and Installation).
Disconnect the brake tube fitting.
Torque: 159 lb.in (18 Nm) Remove the bolt and wheel cylinder.
Torque: 106 lb.in (12 Nm)
 Disconnect the brake shoe lever fitting and re
Copyright © 2026 www.fofiesta7.com