Ford Fiesta: Interior Trim and Ornamentation / A-Pillar Trim Panel. Removal and Installation
Ford Fiesta 2014 - 2019 Service Manual / Body and Paint / Interior Trim and Ornamentation / A-Pillar Trim Panel. Removal and Installation
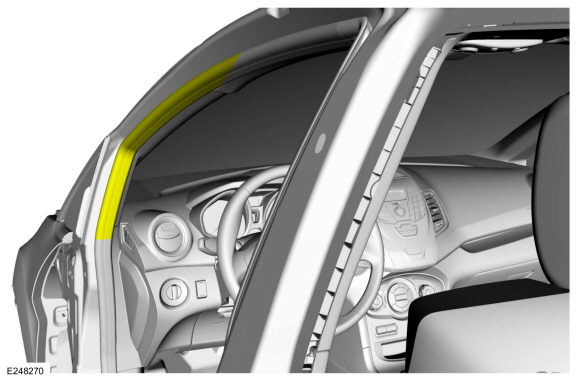
Removal
NOTE: Removal steps in this procedure may contain installation details.
NOTE: LH shown, RH similar.
-
Position the front door weatherstrip aside.
 |
-
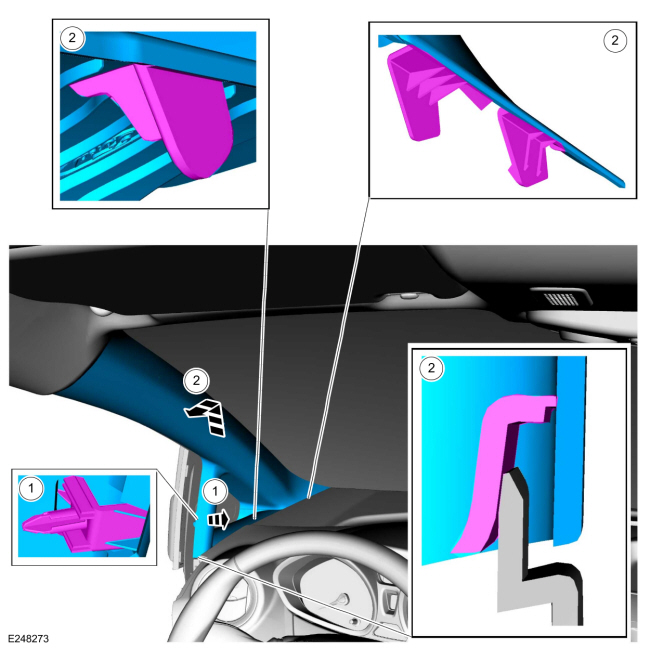
Disconnect the tether clips from the A-pillar trim panel.
-
Release the A-pillar trim panel clip from the tether clip.
-
NOTE: The tether clips have two tabs and will require rotating of the tether clip line in two stages to align both tabs.
Rotate the tether clip line to align tabs with opening.
-
Slide tether clip tabs out of the A-pillar trim panel.
-
Release the A-pillar trim panel clip from the tether clip.
 |
-
Remove the A-pillar trim panel.
-
Release the locator pin.
-
NOTE: During installation, make sure all A-pillar trim panel tabs are fully seated.
Release the A-pillar trim panel tabs.
-
Release the locator pin.
 |
Installation
-
To install, reverse the removal procedure.

 Rear Door Trim Panel. Removal and Installation
Special Tool(s) /
General Equipment
Pick Hook
Interior Trim Remover
Removal
Release the clip and remove the rear door sail panel...
Other information:
Ford Fiesta 2014 - 2019 Service Manual: Accessory Drive - Component Location. Description and Operation
Item Description 1 Accessory drive belt tensioner 2 Water pump pulley 3 Crankshaft belt pulley 4 Pulley - A/C compressor 5 Drive belt idler pulley assembly 6 Generator pulley 7 Accessory drive belt ..
Ford Fiesta 2014 - 2019 Service Manual: Inspection and Repair after a Supplemental Restraint System (SRS) Deployment. General Procedures
Inspection WARNING: If a vehicle has been in a crash, inspect the Restraints Control Module (RCM) and impact sensor mounting areas for any damage or deformation. Also inspect the related components for any cracks, damage, or loose fasteners. If the mounting area is damaged, restore the area(s) to the original production configuration. After repairing the mounting area(s),..
Categories
- Manuals Home
- Ford Fiesta Service Manual (2014 - 2019)
- Engine
- Jacking and Lifting - Overview. Description and Operation
- Engine - 1.6L EcoBoost (132kW/180PS) – Sigma
- Service Information
- Engine Cooling - 1.6L EcoBoost (132kW/180PS) – Sigma
Brake Master Cylinder. Removal and Installation
Removal
NOTICE: If the fluid is spilled on the paintwork, the affected area must be immediately washed down with cold water.
NOTE: Removal steps in this procedure may contain installation details.
All vehicles
Remove the battery tray.Refer to: Battery Tray - 1.6L Duratec-16V Ti-VCT (88kW/120PS) – Sigma (414-01 Battery, Mounting and Cables, Removal and Installation).
Refer to: Battery Tray - 1.6L EcoBoost (132kW/180PS) – Sigma (414-01 Battery, Mounting and Cables, Removal and Installation).
Disconnect the vacuum tube from the brake booster and detach the routing clip.
Copyright © 2026 www.fofiesta7.com