Ford Fiesta: Rear End Sheet Metal Repairs / Quarter Panel LH - 5-Door. Removal and Installation
Ford Fiesta 2014 - 2019 Service Manual / Body and Paint / Rear End Sheet Metal Repairs / Quarter Panel LH - 5-Door. Removal and Installation
Special Tool(s) / General Equipment
| Resistance Spotwelding Equipment | |
| Hot Air Gun | |
| Air Body Saw | |
| MIG/MAG Welding Equipment | |
| Spot Weld Drill Bit |
Materials
| Name | Specification |
|---|---|
| Metal Bonding Adhesive TA-1, TA-1-B, 3M™ 08115, LORD Fusor® 108B, Henkel Teroson EP 5055 |
- |
| Seam Sealer TA-2-B, 3M™ 08308, LORD Fusor® 803DTM |
- |
Removal
-
Follow the health and safety precautions. WARNING:
Before beginning any service procedure in this
section, refer to Safety Warnings in section 100-00 General Information.
Failure to follow this instruction may result in serious personal
injury.
WARNING:
Before beginning any service procedure in this
section, refer to Safety Warnings in section 100-00 General Information.
Failure to follow this instruction may result in serious personal
injury.
Refer to: Body Repair Health and Safety and General Precautions (100-00 General Information, Description and Operation).
-
For vehicle dimensional information:
Refer to: Body and Frame (501-26 Body Repairs - Vehicle Specific Information and Tolerance Checks, Description and Operation).
-
Remove the following items.
Refer to: Rocker Panel Moulding (501-08 Exterior Trim and Ornamentation, Removal and Installation).
Refer to: Rear Door (501-03 Body Closures, Removal and Installation).
Refer to: Rear Bumper (501-19 Bumpers, Removal and Installation).
Refer to: C-Pillar Upper Trim Panel - 5-Door (501-05 Interior Trim and Ornamentation, Removal and Installation).
Refer to: Liftgate (501-03 Body Closures, Removal and Installation).
Refer to: Rear Lamp Assembly (417-01 Exterior Lighting, Removal and Installation).
Refer to: Rear Quarter Window Glass - 5-Door (501-11 Glass, Frames and Mechanisms, Removal and Installation).
Refer to: Loadspace Trim Panel - 5-Door (501-05 Interior Trim and Ornamentation, Removal and Installation).
Refer to: Rear Seat Cushion (501-10 Seating, Removal and Installation).
-
Reposition the carpeting and wiring harness away from the working area.
-
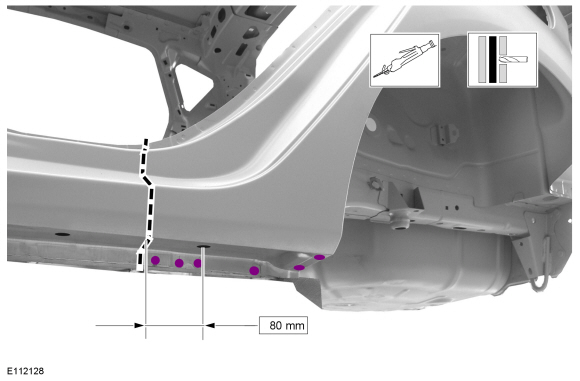
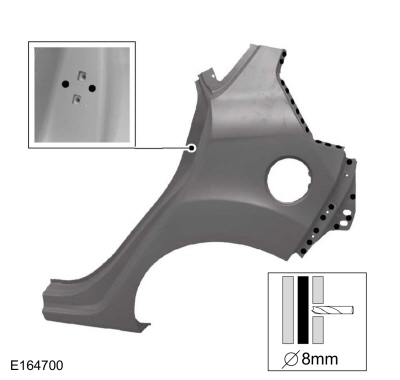
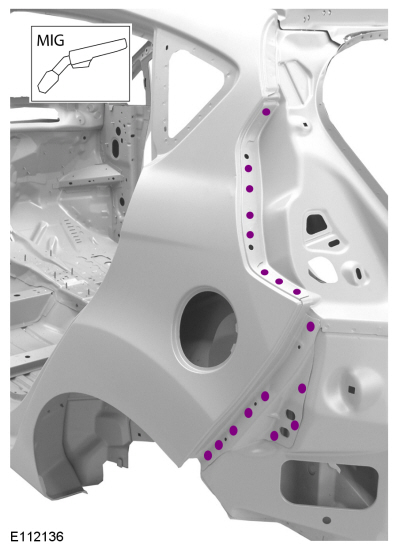
Drill out the spot welds and carefully measure and cut the outer panel only as indicated.
Use the General Equipment: Air Body Saw
Use the General Equipment: Spot Weld Drill Bit
 |
-
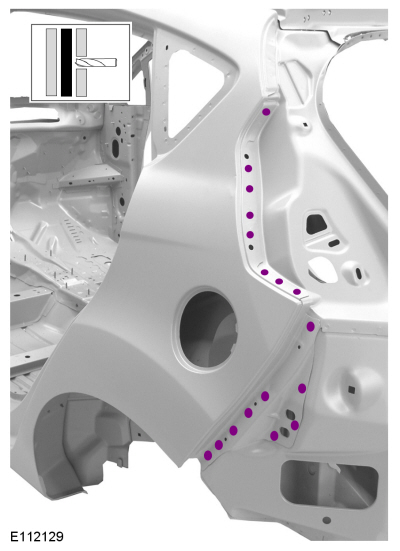
Drill out the spot welds.
Use the General Equipment: Spot Weld Drill Bit
 |
-
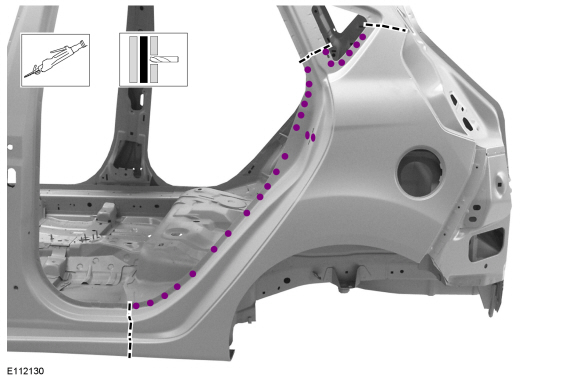
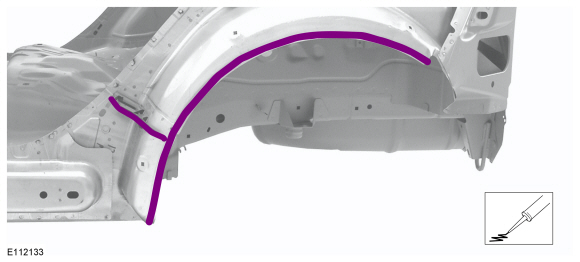
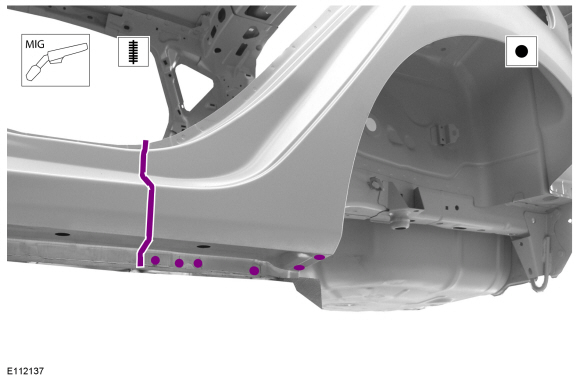
Drill out the spot welds and carefully cut the outer panel only as indicated.
Use the General Equipment: Spot Weld Drill Bit
Use the General Equipment: Air Body Saw
 |
-
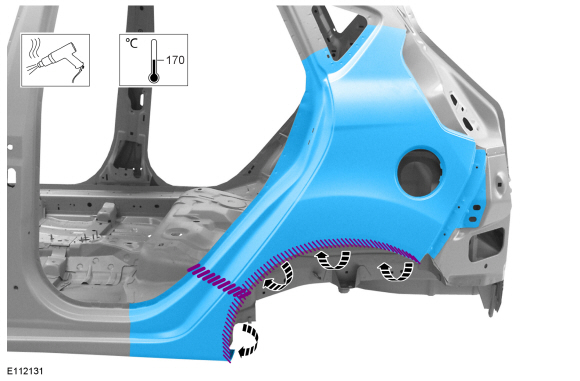
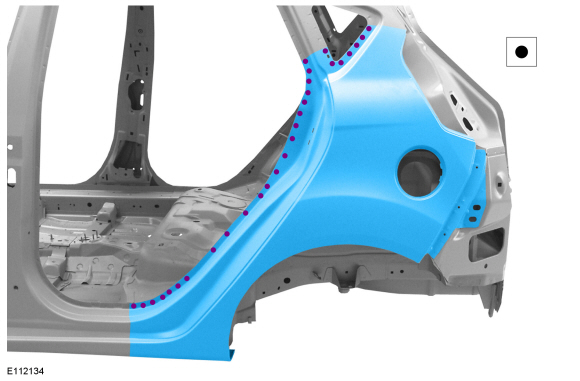
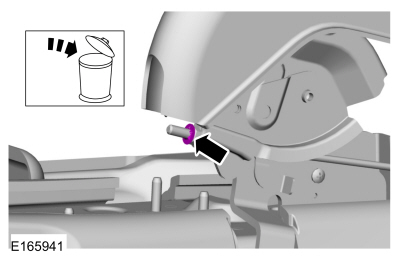
Break the adhesive bond and remove the quarter panel section.
Use the General Equipment: Hot Air Gun
 |
Installation
-
Carefully measure and cut the replacement panel to fit repair area.
Use the General Equipment: Air Body Saw
-
Drill plug welds holes in replacement panel.
 |
-
Apply metal bonding adhesive.
Material: Metal Bonding Adhesive / TA-1, TA-1-B, 3M™ 08115, LORD Fusor® 108B, Henkel Teroson EP 5055
 |
-
Install the replacement panel and spot welds.
Use the General Equipment: Resistance Spotwelding Equipment
 |
-
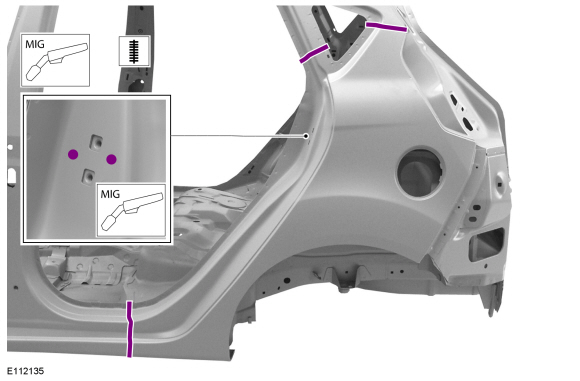
Install the seam and plug welds.
Use the General Equipment: MIG/MAG Welding Equipment
 |
-
Install the plug welds.
Use the General Equipment: MIG/MAG Welding Equipment
 |
-
Install the seam and spot welds.
Use the General Equipment: MIG/MAG Welding Equipment
Use the General Equipment: Resistance Spotwelding Equipment
 |
-
Metal finish as required using typical metal finishing techniques.
-
Sealing work: All areas must be sealed to production level.
Material: Seam Sealer / TA-2-B, 3M™ 08308, LORD Fusor® 803DTM
-
Refinish using a Ford approved paint system.
-
Restore corrosion protection.
Refer to: Corrosion Prevention (501-25 Body Repairs - General Information, General Procedures).
-
Reposition the carpeting and wiring harness.
-
Install the following items.
Refer to: Rocker Panel Moulding (501-08 Exterior Trim and Ornamentation, Removal and Installation).
Refer to: Rear Door (501-03 Body Closures, Removal and Installation).
Refer to: Rear Bumper (501-19 Bumpers, Removal and Installation).
Refer to: C-Pillar Upper Trim Panel - 5-Door (501-05 Interior Trim and Ornamentation, Removal and Installation).
Refer to: Liftgate (501-03 Body Closures, Removal and Installation).
Refer to: Rear Lamp Assembly (417-01 Exterior Lighting, Removal and Installation).
Refer to: Rear Quarter Window Glass - 5-Door (501-11 Glass, Frames and Mechanisms, Removal and Installation).
Refer to: Loadspace Trim Panel - 5-Door (501-05 Interior Trim and Ornamentation, Removal and Installation).
Refer to: Rear Seat Cushion (501-10 Seating, Removal and Installation).

 Water Drain Panel - 5-Door. Removal and Installation
Special Tool(s) /
General Equipment
Resistance Spotwelding Equipment
Air Body Saw
8 mm Drill Bit
MIG/MAG Welding Equipment
Spot Weld Drill Bit
Locking Pliers
Materials
Name
Specification
Seam SealerTA-2-B, 3M™ 08308, LORD Fusor® 803DTM
-
Removal
WARNING:
Before beginning any servi..
Other information:
Ford Fiesta 2014 - 2019 Service Manual: Heated Window Grid Wire Repair. General Procedures
Materials Name Specification Motorcraft® Ultra-Clear Spray Glass CleanerZC-23 ESR-M14P5-A Motorcraft® Rear Window Defroster RepairPM-11 WSB-M4J58-B Motorcraft® Lacquer Touch-Up PaintPMPC-19500-XXXXA, PMPM-19500-XXXXG, PMPP-19500-XXXXA ESR-M2P100-C Repair NOTE: The antenna and heated window grid line material is not..
Ford Fiesta 2014 - 2019 Service Manual: Clutch Master Cylinder - 6-Speed Manual Transmission – B6. Removal and Installation
Removal Refer to: Clutch Pedal (308-02 Clutch Controls - 5-Speed Manual Transmission – B5/IB5/6-Speed Manual Transmission – B6, Removal and Installation). Remove the 2 insulators from the clutch pedal assembly. NOTICE: The 4 tabs on the clutch pedal pin are very brittle and can easily be broke if not com..
Categories
- Manuals Home
- Ford Fiesta Service Manual (2014 - 2019)
- Jacking and Lifting - Overview. Description and Operation
- Engine Cooling - 1.6L EcoBoost (132kW/180PS) – Sigma
- Front Suspension
- Engine
- Cylinder Head. Removal and Installation
Parking Brake Control. Removal and Installation
Removal
NOTE: Removal steps in this procedure may contain installation details.
Remove the floor console.Refer to: Floor Console (501-12 Instrument Panel and Console, Removal and Installation).
Remove the driver seat.
Refer to: Front Seat (501-10 Seating, Removal and Installation).
Remove the parking brake cable adjustment lock nut.
 Loosen the parking brake cable adjustment nut.
Copyright © 2026 www.fofiesta7.com