Ford Fiesta: Climate Control System - General Information / Condenser Core Leak Check. General Procedures
Ford Fiesta 2014 - 2019 Service Manual / Climate Control System / Climate Control System - General Information / Condenser Core Leak Check. General Procedures
Special Tool(s) / General Equipment
| Air Conditioning Service Unit | |
| Air Conditioning Adaptor Kit |
Inspection
-
Recover the refrigerant. Refer to Air Conditioning (A/C)
System Recovery, Evacuation and Charging procedure in Group 412.
-
Disconnect the condenser from the A/C system. Refer to the appropriate section in Group 412 for the procedure.
-
Use the correct adapters with the A/C Service Unit to test the condenser.
-
219-00082 ACF-3000 33PC Adapter Kit - Revised 1st released 44pc kit.
-
219-00083 A/C Flushing Adapter Kit 2 of 3 (Previously "Supplement A", 2nd released kit).
-
219-00084 A/C Flushing Adapter Kit 3 of 3.
Use the General Equipment: Air Conditioning Adaptor Kit
-
219-00082 ACF-3000 33PC Adapter Kit - Revised 1st released 44pc kit.
-
NOTE: The automatic shut-off valves on some hoses do not open when connected to the fittings. If available, use hoses without shut-off valves. If hoses with shut-off valves are used, make sure the valve opens when attached to the adapter fittings. The test is not valid if the shut-off valve does not open.
Connect the hoses from the A/C Service Unit to the adapter fittings on the condenser.
-
265‐37887 Ritchie R134A A/C Refrigerant Hybrid Management System
Use the General Equipment: Air Conditioning Service Unit
-
265‐37887 Ritchie R134A A/C Refrigerant Hybrid Management System
-
Open both valves and start the vacuum. Allow the A/C
Service Unit to vacuum for a minimum of 45 minutes after the low
pressure gauge indicates 101 kPa (30 in-Hg). The 45-minute evacuation is
necessary to remove any refrigerant from oil left in the condenser. If
the refrigerant is not completely removed from the oil, outgassing will
degrade the vacuum and appear as a refrigerant leak.
-
If the low pressure gauge reading will not drop to 101 kPa (30 in-Hg) when the valves are open and the A/C
Service Unit is operating, close the valves and observe the low
pressure reading. If the pressure rises rapidly to zero, a large leak is
indicated. Recheck the adapter fitting connections before installing a
new condenser.
-
After evacuating for 45 minutes, close the valves and
stop the service unit. Observe the low pressure gauge; it should remain
at the 101 kPa (30 in-Hg) mark.
-
If the low pressure gauge reading rises 34 or more
kPa (10 or more in-Hg) of vacuum from the 101 kPa (30 in-Hg) position in
10 minutes, a leak is indicated.
-
If a very small leak is suspected, wait 30 minutes and observe the vacuum gauge.
-
If a small amount of vacuum is lost, operate the
service unit with the valves open for an additional 30 minutes to remove
any remaining refrigerant from the oil in the condenser. Then recheck
for loss of vacuum.
-
If a very small leak is suspected, allow the system
to sit overnight with vacuum applied and check for vacuum loss.
-
If the low pressure gauge reading rises 34 or more
kPa (10 or more in-Hg) of vacuum from the 101 kPa (30 in-Hg) position in
10 minutes, a leak is indicated.
-
If the condenser leaks, as verified by the above
procedure, install a new condenser. Refer to Condenser procedure in
Group 412.
 Air Conditioning (A/C) System Recovery, Evacuation and Charging. General Procedures
Special Tool(s) /
General Equipment
Air Conditioning Service Unit
Refrigerant Identification Equipment
Recovery
NOTICE:
Use an A/C refrigerant analyzer before recovering any of the vehicle's
A/C refrigerant...
 Electronic Leak Detection. General Procedures
Special Tool(s) /
General Equipment
Electronic Leak Detector
Inspection
NOTE:
Use a Rotunda-approved Electronic Leak Detector for R-134a refrigerant SAE Certified to J2791...
Other information:
Ford Fiesta 2014 - 2019 Service Manual: Brake Caliper Anchor Plate. Removal and Installation
Removal Refer to: Brake and Clutch Systems Health and Safety Precautions (100-00 General Information, Description and Operation). Remove the brake pads. Refer to: Brake Pads (206-03 Front Disc Brake, Removal and Installation)...
Ford Fiesta 2014 - 2019 Service Manual: Coolant Bypass Solenoid Valve. Removal and Installation
Special Tool(s) / General Equipment Hose Clamp Remover/Installer Removal NOTE: Removal steps in this procedure may contain installation details. Drain the cooling system. Refer to: Engine Cooling System Draining, Vacuum Filling and Bleeding (303-03B Engine Cooling - 1...
Categories
- Manuals Home
- Ford Fiesta Service Manual (2014 - 2019)
- Clutch - 6-Speed Manual Transmission – B6
- Engine Component View. Description and Operation
- Engine
- Engine System - General Information
- Cylinder Head. Removal and Installation
Front Strut and Spring Assembly. Removal and Installation
Removal
NOTE: Removal steps in this procedure may contain installation details.
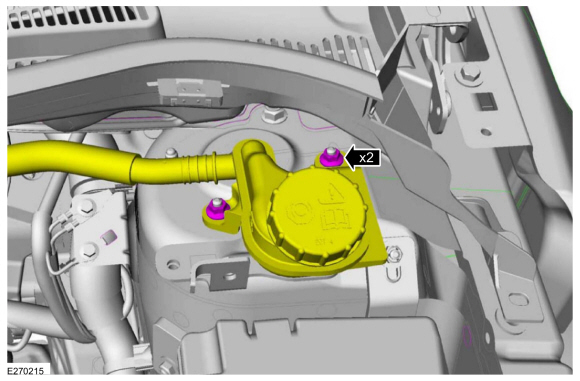
NOTE: This step is only necessary when installing a new component to the left-hand side.
Remove the nuts and position aside the remote brake fluid reservoir.Torque: 62 lb.in (7 Nm)
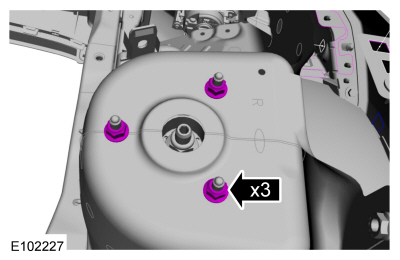
 Remove the strut and spring assembly upper mount nuts.
 Torque: 22 lb.ft (30 Nm)
Copyright © 2026 www.fofiesta7.com